Race parents, if you have a child in our TR group, you may as well get it over with. Take your wallet to Fresh Air Experience or Kelowna Cycle before the snow flies. In my house, it goes something like this: “Let’s go Dad. Bring your wallet.”
You and your child MUST maintain the skis. Don’t expect our coaches to do this for you. You are ALWAYS responsible for glide waxing for practices and ALWAYS responsible for cleaning the grip zone on classic skis before a race. You should be glide waxing MINIMUM every 2 weeks. If your ski bases are white, not the rich black colour they were when you first brought them home, you are not properly maintaining your skis. The white is oxidation that happens when the pores in the ski base are not filled with wax and that white material will make it very difficult for your child to compete.
Buy the wax iron. That is the tough one because it is going to cost you over $100. Once you have the wax iron, the rest comes easy. Just thank the stars that your child’s passion is not in swimming or hockey – a $100 wax iron is a very small investment compared to what it could have been… And, by the way, I can confirm that you will enjoy your skiing much more as well because you will have the right equipment and supplies to maintain your own skis.
Unsure what you should purchase? Bring a printout of this article to Fresh Air Experience or Kelowna Cycle. Their staff know the race team coaches and they will hand-pick the items you need for your wax kit. Be sure to tell them it is for a Telemark athlete because both stores are generous supporters of our race team and there is a race team discount.
Rode Waxing Guideline and Tricks can be found here! Direct link to original document on a Rode webpage is Rode Waxing Guide 2012-2013 IMP.
Contributed by Ross McKinnonThere are many great waxing resources out there, links can be found here. There are two types of waxing; grip waxing for classic skiing and glide waxing for both classic and skating.
For junior development and racing team skiers a few basic items are needed to start.
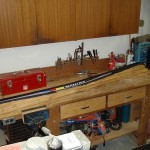
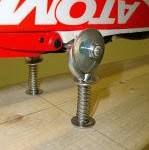
-A ski form – to hold the skis in place while glide and grip waxing. This can be purchased or made out of wood. One of the difficulties with a homemade bench is the problem of securing the ski to the form while scraping and brushing. The above link and picture below have some great ideas.
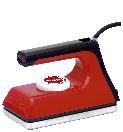
-An iron for grip waxing – spend a bit more and buy an iron made specially for waxing skis. Wax irons cost more, but have a decreased chance of overheating the base of skis. Most irons will have a temperature setting that will match the temperature to the wax you are melting, i.e. warm conditions will require a warm wax that will melt at a low temperature.
Ski wax iron
-A Plexiglas scraper – for removing glide wax
-A metal scraper or putty knife for removing grip wax
–Wax remover for removing grip wax
-A bronze brush for brushing skis after glide waxing
-A synthetic cork for grip waxing
–Grip wax – things can get overwhelming with the amount of wax available and all the different brands. The best advice is to start with one brand only and then move to a larger selection, picking waxes that work best in certain conditions. At Telemark, I have had the best luck with Rode and Start waxes. Don’t worry about spending a lot of money on fluorocarbon waxes; just buy the cheaper regular waxes. I would suggest that you start with one wax from each color, i.e. Rode: Red Extra, Violet, Multigrade Violet and Super Blue. The team has a large selection of waxes from a lot of different companies that are used for races.
–Glide wax, as mentioned above there are lots of brands and wax. Don’t worry about fluorocarbons; just get the cheaper regular hydrocarbon wax. Buy a warm wax for zero degrees Celsius or slightly below and another wax for around -5°C. Luckily we don’t usually need a lot of the cold waxes. Again, start with one brand and then expand out as you learn which waxes work the best in different conditions.
Glide waxing
-For classic skis, only the tip and tails will be glide waxed, whereas for skating the entire ski will be glide waxed.
-The wax iron should be set to the correct temperature for the wax being used. The wax should melt easily. If there is a lot of smoke coming from the iron it is too hot. The glide wax is dripped onto the base and then smoothed out from tip to tail. It is recommended that the iron be moved from tip to tail in 10-15 seconds and repeated 2-3 times. Leave the ski to cool for 10 minutes. The wax can then be scraped off with a sharp Plexiglas scraper moving from tip to tail. The groove and edges should be cleaned with a groove scraper. The bronze brush is then used, brushing back and forth tip to tail. The brushing is the final step in removing the wax. This video demonstrates how to hot wax.
Prepping classic skis for waxing
The grip zone / wax pocket should be clearly marked on both sides of the ski with a permanent sharpie marker to make waxing easier. Prior to initial grip waxing a new set of skis should have the grip zone / wax pocket sanded with sand paper. Typically 100-grit sandpaper is used. Wrap the sandpaper around a cork or sanding block. Abrade the base on both sides of the groove using a back and forth motion. The sanding roughens the base to help the grip wax stick to the ski. This doesn’t need to be done very often throughout the season.
Grip waxing
Grip wax is best applied in thin even coats aiming for 4-6 layers. If waxes are applied too thickly or ‘globed on’ it slows the ski down and runs the risk of icing (snow penetrates the wax and sticks to it). Grip wax is chosen based on a variety of factors; snow temp, humidity, type of snow, strength of skier, etc. It is best to read the wax company’s recommendations found on each tin of wax. Most racers will wax with a slightly warmer wax than what the temp calls for. Generally speaking colder temperatures require a harder wax while warmer temperature calls for softer waxes. The wax is gently crayoned on the ski base grip zone / wax pocket then corked in to smooth out the wax. Another video can be viewed here, which demonstrates grip waxing.
The next step is to test the grip wax. Proper grip is critical to learning how to ski properly and not be frustrated. Grip should be tested on a slight incline. A skier should have very positive grip using very light poling. If there is too much slipping then it is best to try a bit more of the same wax or go one wax warmer. If there is snow sticking to the wax, the wax is too warm. This wax will need to be scraped off with the metal scraper / putty knife and then a colder wax needs to be reapplied.
Grip waxing is the most difficult in warmer conditions, as it is more difficult to match the wax to the snow conditions.


